Here is a development of the outline of our opening sequence. We have changed some of the order of shots, however the overall mood and narrative has stayed similar.
Developing off our test shoots will help us create our story boards.
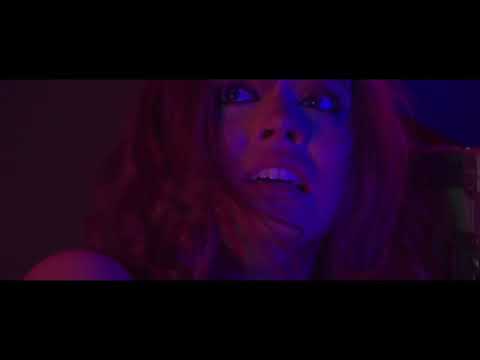
girl crying close up
club - bodies in background, not vocal point
girl - hands shaking
club -bodies in background, not vocal point (ring)
dress ripped / blood
club - bodies in background, not vocal point
her - crying again
main characters back
His hands holding hammers / rings
crawling body - above shot
Main character - behind - crack neck
close up of blood dripping from hammer
close up of floor, blood dripping
walks over (different angles)
long shot of him hitting body
cut before he hit body to girl screaming
Pan to man looking at girl , standing over body with hammers (he drops them)
Today we learnt about story boarding as we will need to create a story board for our opening sequence.
Story boarding is important for pre-production g because it puts everyone on the same page and have the same idea of the outcome. Story boarding is an easy way to share your vision, and used as a communication tool from the director to crew (DOP, Camera Operator etc). This process helps the studio save money. On filming days It is a lot quicker to have your shots planned out, this means less hire time for studios, equipment etc because everyone knows what they are doing, where shots are and in what order. You can spend infinite time on a story board, you can't spend infinite amount of filming as you are paying actors, crew and space. It allows the creatives to have time to be experimental.
Story boarding also helps in post - production such as editing. The story board gives the editor a guide line to follow. This makes it easier for them as they probably have hours of footage to sort through.
We were reminded of filming techniques we learnt about last week to make our film visually interesting, such as:
- Rules of thirds
- Foreground, Background
- Symmetry / Asymmetry
- Editing
- 180 degree rule
On the information side, you should included the following details:
Overall, this test shoot was very helpful for our group to see how our idea translated to film and what parts needed developing and improving. In saying that we like the concept of our idea and with improvements think it'll be effective and grip the audience.
Our test shoot was 1 minute long. Our time frame is 2 minutes. We have decided to extend the beginning before introducing the main character.
After watching our test shoot we thought that the pace is too fast at the beginning. So, we are going to make the start slower with more shots of the girl terrified and different areas of the club. Then, when we are introduced to the main male character we the pace will speed up, so it will be more effective and action based.
One thing we did think was successful in our test shoot was that the narrative comes across and is clear to the viewer. We like the concept and storyline of our opening sequence. We have a good base and with proper planning and storyboarding it'll come together.
We didn't think as much tension was created in our opening sequence as we liked. But with our new order of shots and development from our test shoot, I think It will be successful in gripping the audience.
Some angles we really liked. For example we liked the blood dripping off the hammer and the close up of the floor with drips of blood falling.
However we didn't really like the angle of the girl crying. So we will develop this into something more believable. We thought maybe close ups of her hands shaking, her eyes / face as well as mid shots of her scared.
We also didn't like how the main character went to go and pick up the hammers. Why would he just leave them lying round?
Adding more of the girl at the beginning will help us make the stakes higher for the sequence. We believe that in order to make someone scary or 'cool' it's import to show the reaction of other characters not just the main characters action. So, the girl being horrified and scared shows the viewers that this man is terrifying.
Something that didn't work was the everyday outfit of the main character in our test shoot. After discussion we have decided to dress him in something memorable and unique. Hopefully this will make his character more intimidating and interesting. Possibly a big jacket and some sort of head piece or cap. On the other hand we like that he starts shirtless and then puts on a jacket. The shot of his back with tattoos and neon lightings hopefully will be striking.
To conclude this review I think we are on the right track and have picked up on some good points to improve. Without this test shoot we would have stumbled into these problems on the day of shooting which would've wasted time. So thinking about these things now will help us create a more interesting, suspenseful opening sequence.
This is our test shoot. We made a test shoot in class to get an idea of what our film will look like, what problems will come up, which shots we like and if we have enough content to fill the time requirements.
Today we did a test shoot for our opening sequence. We did this to see what works and what needs improvement. This exercise was good to see how much material we had, and if it fit the time requirements. We played around with different shot types to agree on which ones as a group we liked the best. Doing a test shoot will help our real opening sequence shoot. It is better to have stumbled into a problem in our test shoot than in our real thing.
We planned this test shoot by doing a full breakdown of our opening sequence and what will happen. We also planned our location, which was the studio. Then we decided on substitute props for the hammer etc. We obviously we can't bring real weapons to school. We just used water bottles, so the main guy has something to hold.
We planned what characters we needed - Main guy - Danny, Bodies -All, Scared little girl - Saskia
We also decided on our roles....
Roles -
Danny - DOP, CO-DIRECTOR AND ACTOR
Saskia - ASSISTANT C.O, ACTOR, EDITOR
Sienna - MAIN C.O, EDITOR
After shooting on Wednesday, I think we found this quite hard because we only had 35 minutes. I think we could have planned better the order we filmed our shots so that the continuity remained, and we didn't miss any important shots. I think doing a rough story board would've made us more time efficient and as a group given us the same overall picture.
I think experimenting will different angles and shot types went well. We all agreed that we liked the floor shot of the blood dripping. We also listened to each others ideas and respected each others opinions. It's good that we can work well as a group, so when we do the real thing our shoot will sail smoothly.
However, we did struggled to capture the narrative and mystery we intended the opening sequence to have. It didn't look like how each of us imagined it. Although this was the case, this test shoot was extremely helpful because we can learn to make it better, have more structure and be more believable.
I have tried to capture our narrative and concept in this mood board. By showing an idea of what the main character is wearing, lighting, genre, weapons and significant props like the ring.
Some of the more important photos and why.
I chose this photo because it captures the vibe of the lighting that we are considering. We liked the neon lighting and way that the space looks like a club
I added this ring because at the end of the opening sequence we want to incorporate the idea of a ring being significant to the rest of the film
Opening shot, with neon lights and bodies in the background
This is the weapon we are considering for the main character to use.
club
shot idea for our main character to be standing in silhouette holding the hammers
We want our main character to be wearing a memorable jacket and accessories
Today I am doing independent research to improve our open sequence.
Fake blood
The second piece of research I'm going to do is research into how to make fake blood. I'm doing this because we will need it for our opening sequence.
I choose this video because it has a variety of colour and texture tutorials.
For thin, transparent blood.
Ingredients:
Karo syrup
Red, blue, yellow, green food colouring
(Tip) A bowl and wash cloth is useful to wash colouring off your hands etc.
- Mix ingredients
(Tip) Test the colour on a white surface, like a paper towel.
(Tip) If the blood beads up on the skin, add washing up liquid
For a thicker consistency you can add cocoa powder or corn starch.
Makeup Research
Because we have our main character hitting a person in the club with a hammer. I was thinking incase we want to show this we could try some makeup. I chose this video because it doesn't use too many products and it is simple and achievable.
First the girl uses a nude eye pencil to outline where she wants the split in her head in be. Then she apply's some facial glue over the pencil, where she wants the nude scar wax to be placed. She then apply's the scar wax by rolling in into a sausage like shape and moulding it to her face. (TIP, use oil or vaseline on your fingers before working with wax)
She then makes a cut down the centre of the wax and applies liquid latex on top to make the wax more sturdy.
She then adds black into the centre of the cut.
Then we add fake blood to the edges and inside of the wound, adding blush as well to the very outer edges gives a bruising effect. Finally adding flicks of fake blood over the face to finish the look.
How to Shoot a Film in Neon Lighting
Firstly, If you are going for a club look (like we are) It's good to either use contrasting colours like pink and blue or use one colour with another light to add depth and to highlights features.
You can use Quasar science LED strips, or Tungsten lamps with gels
Steps to get a shot like this:
flood the room with the dominant neon colour. In this case blue. (if you aim the light at the ceiling this avoids shadows.)
adding another light of the other side of the subject which helps with separation
you can also add movement through lighting. For example a club would probably have a laser disco ball or a regular disco ball
This research was relevant to our opening sequence as our location is a club and we intend on using neon lights. Understanding a little bit more about how light works and special tips on how to use neon lights will be very useful for our project.
Today Saskia and I presented our idea's to Mike and Matt. They liked our idea and gave us some feedback. They thought the importance of what the main character is wearing if vital to the memorability and iconic look of the character. Over the next couple days we will look for a costume that fits our film.
They also gave the idea of the main character would be resuscitating a man, seeing if he is alive before then killing him?
Another idea was that there is a girl in the club that the man isn't touching. She is hyperventilating, this would give us more to film to fill out the in the opening sequence.
She would be terrified and upset
This feedback was useful, and when we come together as a group we will discuss what we want to include moving forward.
Developments
We agreed the shattered glass was to cliché, so we decided on a regular mirror.
We liked the idea of the girl, so as a group we are going to add that in to fill out our opening sequence.
The main character will have a memorable outfit.
We were planning of using an A2 boy as our main character but yesterday we found out we can't use them due to exams moving forward. Because of this we are looking for an A1 to play the main guy.
New Outline, Full Break Down of What Happen
man in club sitting on chair, no shirt on and listening to music
shot of his back
shot of his his back/side profile (focussing on ear)
shot of his hands then feet with a hand on the floor.
shots of the club, lights, different features
cut to man crawling, begin on his legs then follows him up with blood trailing him
camera cuts back to a behind shot of
Slight sigh from killer, puts on coat and stands up as he. Music cuts to loud, soundtrack
One long take of killer putting on coat, picking up hammer and slowly walking to guy crawling
We saw his whole persons walking through this nightclub esc hallway with pink and purple lights
We then cut to the man crawling again and the cameras at his level, music cuts back to being played out of earphone
We see the killer striking his hammer down, (music cuts back to loud and soundtrack) and then cut before impact to girl in the corner gasping
Cut back to behind of killer, camera pans when he slowly looks over to see her sitting there terrified
Then cut to bunch of more dead bodies on ground. They are all dead and bloody. Music is still soundtrack.
Cut to rings as well on dead people, same ring on all of them - criminal syndicate type beat.
Silhouette of man walking out with lights. He leaves girl alone, she is alive.
Today we learnt about the 180 degree rule. A rule that is fundamental to keep the continuity and sense for the audience. The 180 degree rule is an imaginary line where the camera cannot pass one side. This keeps the actors either on the left or the right. This helps the audience grasp where the actors are in the room.
·
We were also introduced to the practice of 'three'. This is where you film a full scene three times or with three cameras. This gives you options to cut to and from different angles or shot types. The order in which you film these would be a wide, mid and lastly, close up. A wide is important to film first as it establishes the scene. A rule with this technique is to ensure the actors movement and placement are exactly the same, this keeps the scene's continuity. Usually, there will be a mark on the ground for the actor to stand on, making sure they are in the same place for the different takes.
When we started recording we learnt about call outs. The director or assistant director yells 'stand by,' to ensure everyone is ready to shoot. It is called this because it is strictly a professional term. They then say 'roll camera'. The camera man then says 'camera rolling', this is to ensure the camera is recording. The director yells 'action' at the beginning of the scene and then 'cut' at the end. It is important that the camera man begins filming before saying action and continues recording after the scene has ended and before saying cut. This ensures that they have all what the director wants on camera.
I discovered in this workshop that you shouldn't watch the footage back on set. This would simply just take too much time, and double the length of one take. Letting the actors look a the footage on set could trigger them to start over thinking, or become insecure.
In our workshop today we were introduced to a Tripod, Camera and different lens. The camera we were using is called the Black Magic 4k mini URSA.
We learned about the importance of the 'your' and 'mine' rule. So, when handing over a camera, you ensure that the other person has got a hold of the camera before you let go. The person handing the camera says 'your' and the person receiving the camera says 'mine' to ensure that the camera is safe and won't be dropped.
Next we learnt about what spirit level is used for. It is to ensure the tripod is level, therefor making the camera level and shot balanced.
To stand the tripod up you open it, and then loosen the nobs at the bottom of each leg. Then you pull the tripod up, and turn the nobs again to keep it in place. A tip we learnt was to start at the bottom of the tripod and then if you need the camera higher proceed with the middle.
We learnt about focus and zoom. We turned the end of the lens to zoom and a bit further back to focus. The camera we were using is a manual, so we needed time to get use to focusing etc. When focusing on an object, we learnt zoom in, focus, and then zoom out again. This is to make sure the shot is fully focused. For example, when filming someone you zoom into their eye, focus on this as it's the vocal point of someones face and also the part of the face that has the most detail. Then zoom out again.
Finally we learnt about the importance of striking the kit. This includes making sure the lens is on the camera, the camera is taken off the tripod and put safely back into the box (close the box properly), then making sure the tripod is put down and back into the correct bag. It is important to leave the kit as you found it.
Finally we learnt about white balance. Natural light has a more blue tone compared to inside lights which has a more yellow undertone. So, when changing the lighting, it is important to change the white balance so the shot looks natural. You change the white balance on the camera screen, and choose the appropriate setting.